October 27, 2013

VPNBook : Free VPN

VPNBook is a 100% Free VPN service without any need for registration or sign-up.

Here is how I did my setup : open a terminal :
Applications > Terminal and copy and paste the following line :

sudo apt-get install network-manager-openvpn-gnome 
( will pull in packages network-manager-openvpn and openvpn, the other needed packages are already installed in a default installation ).


Wingpanel > Network-manager-applet > Edit Connections....

Network Connections > VPN > Add  , Choose a VPN Connection Type > PPTP > Create...


Go to VPNBook and look for the PPTP settings. I choose Server #3 : uk180.vpnbook.com (UK VPN - optimized for fast web surfing; no p2p downloading).


Connection name : VPNBook-PPTP-UK ( you can set any name )
VPN tab :
Gateway : uk180.vpnbook.com
User name : vpnbook
Password : qe6resTe ( password changes every one to two weeks ! ,
https://twitter.com/vpnbook )
Check : Show password
Check Available for all users.


Go to Advanced and check Use Point-to-Point encryption ( MPPE ) > press OK button.

Now can choose your VPN connection in the network-manager-applet...

To setup OpenVPN : Go to VPNBook and download one of the OpenVPN Certificate Bundles ( e.g Server #3 ).


Create a new folder in your Home directory and name it e.g. openvpn-config.


Move the downloaded  ( Applications > Files > Downloads ) OpenVPN Certificate Bundle ( VPNBook.com-OpenVPN-UK1.zip ) into the openvpn-config folder and right click and choose Open With Archive Manager.
Hit the button Extract files from the archive 


Choose one of the .ovpn files e.g. vpnbook-uk1-tcp80.ovpn.
We need to create three files in the openvpn-config folder with the names : ca.crt, client.crt and client.key :
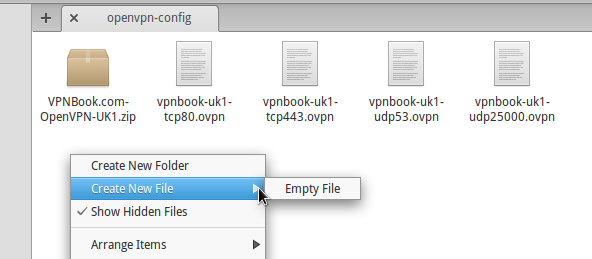


For the next copy/paste actions to work with Scratch ( default text editor ) we need to change it's Autosave feature :


Applications > Scratch > Menu ( gear icon ) > Preferences : uncheck Save files when changed .
This is a known bug : pasted text in Scratch will get lost with Autosave feature enabled...

Open the file vpnbook-uk1-tcp80.ovpn and copy the lines between the <ca> tags and paste into the file ca.crt, save ( second button from the left ) and close.
Copy and paste the lines between the <cert> tags into the file client.crt, save and close.
Copy and the paste the lines between the <key> tags into the file client.key, save and close.


Wingpanel > Network-manager-applet > Edit Connections...
In the window Network Connections > VPN > Import  and navigate to the file vpnbook-uk1-tcp80.ovpn.

Window opens ( Editing vpnbook-uk1-tcp80 ) :
Connection name : choose whatever you like ( I choose VPNBook-OpenVPN-UK ).
Uncheck Connect automatically
VPN tab :
Authentication > Type : choose Password with Certificates ( TLS )
User name : vpnbook
Password :  qe6resTe ( password changes every one to two weeks ! )
User Certificate : navigate to client.crt
CA Certificate : choose ca.crt
Private Key : choose client.key
Finally : Save

Now can choose your VPN connection in the network-manager-applet...

October 26, 2013

Viewnior, A Simple Pictureviewer


Viewnior is an image viewer program. Created to be simple, fast and elegant.

The download page shows that there is no package for Ubuntu....and so we need to compile to make a deb-package.

Download the source from here : http://cloud.github.com/downloads/xsisqox/Viewnior/viewnior-1.3.tar.gz

Go to Downloads in a terminal :
cd Downloads

First install the necessary tools :
sudo apt-get install build-essential intltool dh-make

Development libraries :

sudo apt-get install libgdk-pixbuf2.0-dev libgtk2.0-dev

Extract : 
tar xf viewnior-1.3.tar.gz 

mv viewnior-1.3.tar.gz viewnior-1.3/
cd viewnior-1.3

dh_make --createorig

It will ask :

Type of package: single binary, indep binary, multiple binary, library, kernel module, kernel patch?
 [s/i/m/l/k/n] 


Just type s. Then it will show you some package information that you can edit. Just hit Enter.
Next message :
Done. Please edit the files in the debian/ subdirectory now. viewnior
uses a configure script, so you probably don't have to edit the Makefiles.


dpkg-buildpackage 

At the end ( won't take much time ) :
dpkg-deb: building package `viewnior' in `../viewnior_1.3-1_amd64.deb'.
dpkg-genchanges  >../viewnior_1.3-1_amd64.changes
dpkg-genchanges: including full source code in upload
dpkg-source --after-build viewnior-1.3
dpkg-buildpackage: full upload (original source is included)


cd ..
ls
viewnior_1.3-1_amd64.changes  viewnior_1.3-1.debian.tar.gz  viewnior_1.3.orig.tar.gz
viewnior-1.3  viewnior_1.3-1_amd64.deb        viewnior_1.3-1.dsc


There it is : viewnior_1.3-1_amd64.deb......

Installation is done with gdebi, a simple tool to install deb files ( sudo apt-get install gdebi ).


Links :
http://forums.debian.net/viewtopic.php?t=38976

http://git.debian.org/?p=collab-maint/packaging-tutorial.git;a=blob_plain;f=packaging-tutorial.pdf;hb=refs/heads/pdf

October 25, 2013

Elementary OS Luna Review


......I have to tell you after test-driving it for the last four days I have come to the conclusion that I have really been doing myself a disservice and so are you if you don't download this distro and give it a try..... 


......this is a lightning-fast, responsive desktop that is just ready to go out of the box....

October 24, 2013

Mozilla’s UX-Nightly Build Of Firefox

The UX Nightly branch is the branch where developers can test out new features and experience them for a while before knowing if it’s something they want to ship.

Go to this page : http://people.mozilla.org/~jwein/ux-nightly/ ( or this one ) and download the appropriate build ( 32 or 64-bit, you can find out which one you need by going to Applications > System Settings > About ).
In my case it says : Version: 0.2 "Luna" ( 64-bit ).


Navigate to Downloads and open firefox-27.0a1.en-US.linux-x86_64.tar.bz2 with
Archive Manager ( just click on it ).
You will have a folder named firefox.
Assuming that you have installed and used firefox from the repositories before, I will rename the folder firefox  firefox-ux and move the folder to my home directory :
mv firefox/ ../firefox-ux
cd ../firefox-ux
./firefox -P

In the window that will open create a profile : call it ux  and start UX with this profile:


If all goes well....


Create a desktop file in ~/.local/share/applications with the following lines :
[Desktop Entry]
Version=1.0
Name=Firefox Ux
Exec=/home/username/firefox-ux/firefox -P "ux" --no-remote %u
Terminal=false
X-MultipleArgs=false
Type=Application
Icon=/home/username/firefox-ux/browser/chrome/icons/default/default48.png
Categories=GNOME;GTK;Network;WebBrowser;
MimeType=text/html;text/xml;application/xhtml+xml;application/xml;application/rss+xml;application/rdf+xml;image/gif;image/jpeg;image/png;x-scheme-handler/http;x-scheme-handler/https;x-scheme-handler/ftp;x-scheme-handler/chrome;video/webm;application/x-xpinstall;
StartupNotify=true


Replace username with your username.....

The -no-remote switch will make it possible to run firefox with different profiles simultaneously ( see : http://kb.mozillazine.org/Command_line_arguments ).

Log out and in to see Firefox UX occur in Slingshot.

October 23, 2013

Mount Data Partition At Boot Time

I've created a large Data partition using Gparted. ( filesystem : ext4, label Data ).


Create mountpoint :
sudo mkdir /media/Data

Change ownership to user :
sudo chown $USER:$USER /media/Data

Data partition will be shown in left pane in Files, and manually mounted by clicking on Data.


In Terminal the command mount will show ( among other lines ) :
/dev/sda3 on /media/Data type ext4 (rw,nosuid,nodev,uhelper=udisks)

Adding this line to the file /etc/fstab will mount the partition at boottime :
sudo nano /etc/fstab

Add the line :
/dev/sda3 /media/Data ext4 rw,nosuid,nodev,uhelper=udisks 0 0

Get it mounted without reboot :
sudo mount -a

https://help.ubuntu.com/community/Fstab

October 21, 2013

Music Player Foobnix

Foobnix is a music player for both local and online music. With the online music search feature you can download and save music from VK, the second biggest social network service in Europe after Facebook.


To install :

sudo add-apt-repository ppa:foobnix-team/foobnix-player
sudo apt-get update
sudo apt-get install foobnix

If it doesn't play music :
sudo apt-get install gstreamer0.10-plugins-ugly


Add your Music folder


Customizing radio channels or adding your own ( press My channels ) :


Pressing VK opens up next login window. You need to login to enable search and download of music.


Update Feb 10 2014 : from their site :

We are actively working on a new version of the player 3.0 rewriting it on GTK 3

sudo apt-get remove foobnix
sudo add-apt-repository ppa:popsul1993/ppa
sudo apt-get update
sudo apt-get install foobnix

OpenDNS And Google Public DNS

OpenDNS and Google Public DNS are free, global Domain Name System (DNS) resolution services, that you can use as an alternative to your current DNS provider.


Edit Connections....


In my case : Wired > Edit > IP4 Settings

At Method open the dropdown menu and select Automatic (DHCP) addresses only.

In the DNS servers field, enter the following IP addresses, separated by a comma.

For OpenDNS : 208.67.222.222, 208.67.220.220

For Google Public DNS : 8.8.8.8, 8.8.4.4

Restart Networkmanager ( might not be needed ) :

sudo service network-manager restart

Restart your browser...

To check run the next command in a Terminal :

nm-tool | tail -n 8

OpenDNS checker : http://welcome.opendns.com/