April 17, 2015

Upgrade Freya Beta To Stable

After more than a year and a half of development, elementary OS 0.3 ( codename Freya ) has been released on Sat April 11th, bringing three new default apps, a new notification system, a redesigned multitasking view, UEFI/SecureBoot support along with many other improvements and over 1,100 bug fixes. ( link )


elementary OS Luna users should back up their data and perform a clean install.
The same applies to the users of the beta version of Freya according to the developers of elementary.

If you as a Freya beta user don't want to do a clean install you could to the following to upgrade from beta to stable Freya :

Open a Terminal and first remove the beta PPA's :

sudo add-apt-repository --remove ppa:elementary-os/daily
sudo add-apt-repository --remove ppa:elementary-os/testing

Add the stable PPA :

sudo add-apt-repository ppa:elementary-os/stable
sudo apt-get update

Now remove elementary beta packages :

sudo apt-get remove elementary-os-prerelease 

Update Linux kernel to 3.16 ( I skipped this step ) :

sudo apt-get install --install-recommends linux-generic-lts-utopic xserver-xorg-lts-utopic libgl1-mesa-glx-lts-utopic libegl1-mesa-drivers-lts-utopic

Upgrade the system :

sudo apt-get dist-upgrade

Reboot....

January 19, 2015

Radio Tray Stopped Working In Freya

Radio Tray is an online radio streaming player that runs on Wingpanel. Radio Tray is not a full featured music player, it is a simple application with minimal interface just to listen to online radios. And that's the sole purpose of Radio Tray.

You can install it by opening a Terminal and typing :

sudo apt-get install radiotray 

or by downloading radiotray_0.7.3_all.deb from sourceforge. Install the downloaded package with gdebi. Gdebi is a simple tool to install deb files. It lets you install local deb packages resolving and installing its dependencies.

Sadly Radio Tray stopped working lately in Freya after all the updates.

Starting from a Terminal :

/usr/bin/radiotray showed among other lines :

/usr/lib/python2.7/dist-packages/radiotray/AudioPlayerGStreamer.py:51: FutureWarning: The behavior of this method will change in future versions. Use specific 'len(elem)' or 'elem is not None' test instead.

After some searching I found a solution ( link ) :

Open a Terminal and :

cd /usr/lib/python2.7/dist-packages/radiotray
sudo nano SysTray.py

Use Ctrl+W ( Where Is ) to search for gtk.gdk.threads_init() and place a # sign in front of it.


Ctrl+O to WriteOut, File Name to Write: SysTray.py and hit Enter. Then Ctrl+X to Exit.

Now it will start....


The Ultimate List of Radio Stations

December 21, 2014

Fix Toolbar Synaptic In Freya

Synaptic is a graphical front-end to apt, the package management system in Ubuntu, Debian and elementary OS.
You can install, remove, configure, or upgrade software packages, browse, sort and search the list of available software packages, manage repositories, or upgrade the whole system.
It's my favorite application for package management.
To install open a Terminal and type :

sudo apt-get install synaptic

Unfortunately it looks a bit ugly :


There is however an easy fix :

Right click Files in Plank and choose New Window As Administrator.

Navigate to /usr/share/themes and copy the folder elementary.
Then go to /root and create new folder .themes ( mind the dot ! ).
Paste the folder elementary inside the folder .themes.

Now we need to edit the file gtk-widgets.css in /root/.themes/elementary/gtk-3.0.

Search for Toolbars in Scratch and add GtkHandleBox, like so :


Restart Synaptic Package Manager....

Need a better icon ? Download here.


November 10, 2014

Plank Themes Pantiva And Capeos


Pantiva


Capeos

Download Zip file from this page, extract with Archive Manager. Inside the folder
plank-themes-master are the folders Pantiva and Capeos.
Rightclick Files in Plank and choose New Window As Administrator.

Move the folders Pantiva and Capeos to the folder /usr/share/plank/themes.

Choose your style : Applications > System Settings > Tweaks > Plank > Theme.

November 3, 2014

Missing Dropbox Indicator Icon

After installing the latest Dropbox , it's indicator icon was missing in wingpanel.

You can check if the dropbox daemon is running by ( in Terminal ) :
ps -ef | grep dropbox
eric      2761     1  0 16:29 ?        00:00:09 /home/eric/.dropbox-dist/dropbox-lnx.x86_64-2.10.41/dropbox
eric     30797 30634  0 19:26 pts/0    00:00:00 grep --color=auto dropbox


There is however a simple solution :
Open Terminal and type the following :
cd
nano .xsessionrc

and add the following line :

export DROPBOX_USE_LIBAPPINDICATOR=1

Use Ctrl+O to File Name to Write, just hit Enter and then Ctrl+X to Exit.

And then in the same Terminal :
source .xsessionrc
dropbox stop && dropbox start -i &

( Or logout and login again...).

Another way is by adding the same line to the file ~/.bashrc or the file  /etc/profile ( as administrator ). After that follow same procedure as above.

Instructions to change the blue dropbox indicator icon to a nicer one can be found on this page.


October 22, 2014

Fleeting Password Manager

Fleeting Password Manager is a simple program that generates highly secure pseudo-random passwords from the given master password, URL/ID (e.g. facebook, www.facebook.com, google, my_server..) and user name.
The user needs to remember only the master password to recover other passwords. Passwords are always regenerated on-the-fly from the given login data when needed and are never saved. In other words, Fleeting Password Manager combines the password creation and management. The length of the generated password is configurable between 8 and 32 characters and Fleeting Password Manager can remember wanted URL/User-pairs. 

Notice, that the URL doesn't have to be the real URL, it just has to be exactly the same every time, something that you remember. You can use "gmail" for Gmail, "facebook" for www.facebook.com, "linkedin" for www.linkedin.com and so on. 

As mentioned before, Fleeting Password Manager never saves any passwords. However, the user name, url/id and length can be saved. This data can also be exported and imported from the file menu. The settings data is located as a simple text file in the user's home directory: ~/.config/fleetingpm/fleetingpm.conf.

To install open a Terminal and type the following :

sudo add-apt-repository ppa:jussi-lind/ppa
sudo apt-get update
sudo apt-get install fleetingpm


October 6, 2014

Installing Nvidia Driver From The Website

There are several ways to install the driver for your Nvidia card in elementary OS.

One way is using System Settings > Additional Drivers.


If you want the latest driver go to the website ( option 1 ) and select your card.
Just press the Download and Agree & Download button.

To find your card open a terminal and type :
lspci | grep VGA
01:00.0 VGA compatible controller: NVIDIA Corporation G92 [GeForce GT 330] (rev a2)
My card is a GeForce GT 330.
The latest driver at this moment is version  340.46. I downloaded the file NVIDIA-Linux-x86_64-340.46.run.

The NVIDIA graphics driver is bundled in a self-extracting package. You can extract it with : 
sh NVIDIA-Linux-x86_64-340.46.run --extract-only  
Creating directory NVIDIA-Linux-x86_64-340.46
Verifying archive integrity... OK
Uncompressing NVIDIA Accelerated Graphics Driver for Linux-x86_64 340.46.......................
.

A folder NVIDIA-Linux-x86_64-340.46 is created containing the uncompressed contents of the .run file.
Documentation can be found in :
NVIDIA-Linux-x86_64-340.46/html/index.html and 
NVIDIA-Linux-x86_64-340.46/README.txt


After some googling and attempts I found the right way to install the Nvidia driver :
First in a terminal :
sudo  apt-get install build-essential linux-headers-$(uname -r )

Before attempting to install the NVIDIA driver you should first disable Nouveau. Nouveau ( http://nouveau.freedesktop.org/wiki/ ) is a display driver for Nvidia GPUs, developed as an open-source project through reverse-engineering of the Nvidia driver. Nouveau performs modesets in the kernel. This can make disabling Nouveau difficult, as the kernel modeset is used to display a framebuffer console, which means that Nouveau will be in use even if X is not running. As long as Nouveau is in use, its kernel module ( nouveau.ko ) cannot be unloaded, which will prevent the Nvidia kernel module from loading. It is therefore important to make sure that Nouveau's kernel modesetting is disabled before installing the Nvidia driver.

Some distributions include Nouveau in an initial ramdisk image. If you have an initrd which loads the Nouveau driver, you will additionally need to ensure that Nouveau is disabled in the initrd. In most cases,  rebuilding the initrd will pick up the module loader configuration files, including any which may disable Nouveau. ( see the README.txt ).

Open a terminal and :
sudo nano /etc/modprobe.d/blacklist-nouveau.conf
Copy and paste the following lines :

blacklist nouveau
options nouveau modeset=0


Hit Ctrl+O , Enter and then Ctrl+X

Rebuild initrd :

sudo update-initramfs -u

Reboot and after rebooting do not login and switch to the first virtual (not graphic) terminal by :
Ctrl+Alt+F1
login with your username and password and stop the X-server by : sudo service lightdm stop
Navigate to the downloaded NVIDIA-run file :
cd Downloads and
sudo sh NVIDIA-Linux-x86_64-340.46.run

The .run file is a self-extracting archive. When executed, it extracts the
contents of the archive and runs the contained nvidia-installer utility,
which provides an interactive interface to walk you through the installation.

nvidia-installer will also install itself to /usr/bin/nvidia-installer,
which may be used at some later time to uninstall drivers, auto-download
updated drivers, etc.

Accept the license and answer the following questions :
The distribution-provided pre-install script failed!  Are you sure you want to continue? (Answer: Continue installation)
Would you like to register the kernel module sources with DKMS? This will allow DKMS to automatically build a new module, if you install a different kernel later. (Answer: No)
Install NVIDIA's 32-bit compatibility libraries? (Answer: Yes)
Would you like to run the nvidia-xconfig utility to automatically update your X configuration file so that the NVIDIA X driver will be used when you restart X?  Any pre-existing X configuration file will be backed up. (Answer: Yes)

Your X configuration file has been successfully updated.  Installation of the NVIDIA Accelerated Graphics Driver for Linux-x86_64 (version: 340.46) is now complete.

A log file can be found in /var/log/nvidia-installer.log

Start the X server again :
sudo service lightdm start

In order to have nvidia-settings in Slingshot-launcher navigate to /usr/share/applications and copy NVIDIA X Server Settings to ~/.local/share/applications.
Right click the file and choose Properties.

At Owner click Write button, so that we can modify the file.
Right click the file and choose Open With Scratch.
Change the line Categories=Application;Settings; into Categories=System;Settings;

Applications > NVIDIA X Server Settings


If you wish to uninstall the Nvidia-driver, just open a terminal and :

sudo /usr/bin/nvidia-uninstall

Disable Password Request After Suspend


When the computer resumes from suspend, the screen will be locked. To disable this password request go to Applications > System Settings > Brightness and Lock and uncheck Require my password when waking from suspend.


Another way to disable the lock is the following : open a Terminal and type :

gsettings set org.gnome.desktop.lockdown disable-lock-screen 'true'

September 29, 2014

Terminal Commands To Initiate Gala Windows And Workspaces Actions

Open a Terminal and try the next commands :

dbus-send --session --dest=org.pantheon.gala --print-reply /org/pantheon/gala org.pantheon.gala.PerformAction int32:1
Luna : Workspace Overview ( keep Enter pressed ), Freya : Multitasking View

dbus-send --session --dest=org.pantheon.gala --print-reply /org/pantheon/gala org.pantheon.gala.PerformAction int32:2
Terminal maximizes

dbus-send --session --dest=org.pantheon.gala --print-reply /org/pantheon/gala org.pantheon.gala.PerformAction int32:3
Terminal minimizes

dbus-send --session --dest=org.pantheon.gala --print-reply /org/pantheon/gala org.pantheon.gala.PerformAction int32:4
Slingshot-launcher opens

dbus-send --session --dest=org.pantheon.gala --print-reply /org/pantheon/gala org.pantheon.gala.PerformAction int32:5
Show Desktop

dbus-send --session --dest=org.pantheon.gala --print-reply /org/pantheon/gala org.pantheon.gala.PerformAction int32:6
Window Overview

dbus-send --session --dest=org.pantheon.gala --print-reply /org/pantheon/gala org.pantheon.gala.PerformAction int32:7
Show All Windows

Desktop files for Show Desktop and Workspace Overview are provided by package elementary-plank-extra :

Freya : https://launchpad.net/~versable/+archive/ubuntu/elementary-tweaks-isis
Luna : https://launchpad.net/~versable/+archive/ubuntu/elementary-update

September 5, 2014

Add An Up Button To Pantheon-Files

Default look of Pantheon-Files with Backward and Forward buttons :


To add an Up button to the toolbar of Pantheon-Files we need dconf Editor.
You can install it by opening a Terminal and typing the following command :

sudo apt-get install dconf-tools

Start dconf Editor and go to  org > pantheon > files > preferences and look for toolbar-items in the right pane :

['Back', 'Forward', 'ViewSwitcher', 'LocationEntry']

Change into ['Back', 'Forward', 'Up', 'ViewSwitcher', 'LocationEntry']

Restart Pantheon-Files :


August 19, 2014

Change Button-layout In Freya Beta 1


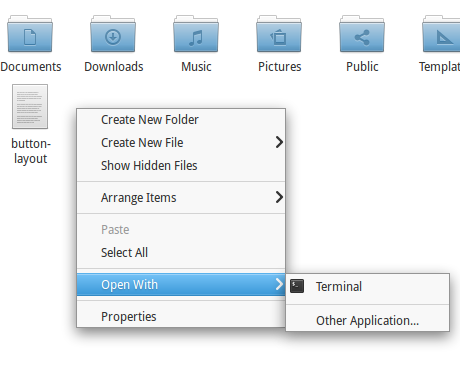
Right click in your Home directory and choose Create New File > Empty File.

Name it e.g. button-layout.

Open file with Scratch and paste the following lines :

#!/bin/bash
gsettings set org.gnome.settings-daemon.plugins.xsettings overrides "{'Gtk/DecorationLayout': <'"$1"'>}"
gsettings set org.pantheon.desktop.gala.appearance button-layout "'"$1"'"
gsettings set org.gnome.desktop.wm.preferences button-layout "'"$1"'"


Close Scratch... ( file will be auto-saved ).


Right click and choose Open With > Terminal.

To change layout in : Close ( left ) and Minimize ( right ) type in Terminal :

sh ./button-layout close:minimize

To change layout in Minimize, Maximize, Close ( all right side ) :

sh ./button-layout :minimize,maximize,close

To change layout to Close ( left ) :

sh ./button-layout close:

( works in the stable version Luna as well ).


August 11, 2014

Freya Beta 1 Available For Developers & Testers

Daniel Foré ( project lead of elementary OS ) announced today that the first beta of elementary OS Freya is publicly available for developers and testers.

Be aware that this is not intended to be used in a production environment :

Software in the beta phase will generally have many more bugs in it than completed software, as well as speed/performance issues and may still cause crashes or data loss.

As omgubuntu says :

So, folks: beta. No finish. No polish. Much bugs. Get it? Got it? Good.

Let's get it :

Freya Beta 32bit | Torrent

Freya Beta 64bit  | Torrent


June 22, 2014

Next Release Renamed To Freya

The next release elementary OS, until now codenamed Isis, has a new name : elementary OS Freya.

The OS releases are named after mythological deities and beings ( Jupiter, Luna ).

According to the developers :

While Isis worked well, there is currently an active militant group in Iraq and Syria commonly known as "ISIS" (Islamic State in Iraq and Syria). elementary obviously has no ties to that group—and we don't think people will get us confused—but we want to both recognize the ongoing turmoil and choose a less controversial name.


Freya is a Norse goddess of love and beauty.

http://elementaryos.org/journal/elementary-os-isis-is-now-freya

Is Freya Released Yet?

June 1, 2014

Lubuntu Software Center

Lubuntu Software Center is a user-friendly, fast and light-weight alternative for Software Center.
It was especially optimised for Lubuntu, a light-weight distro based on Ubuntu.

To install open a Terminal and type :

sudo apt-get install lubuntu-software-center

or use Software Center....

The default view :


There are three tabs at the top: Get Software, Installed Software, and Apps Basket.

If you want to add an application, click the button Add to the Apps Basket :


The Information button will show a description with a screenshot and reviews.

The Apps Basket with the packages to be installed :


Discard button will empty the Apps Basket.

Removing installed software :


Keyboard Shortcuts For Window Placement

There are a number of keyboard shortcuts in System Settings > Keyboard > Windows, but to add more of them you will need a tool called dconf-editor.

To install this tool open a Terminal and copy/paste next line :

sudo apt-get install dconf-tools

Applications > dconf Editor

Navigate to org > gnome > desktop > wm > keybindings

We are going to add keyboard shortcuts to place windows in these different directions :


Keys that are used : Super ( Windows ) and Keypad numbers.

Assign the following shortcuts :


May 30, 2014

New Community Website Launched Today

Stephen Myall, owner of the popular website reboot2elementary, has announced today that a new community website for elementary OS users has launched.
The new website is a collaboration of Stephen Myall with a project team of elementary OS users.

The new elementarynow site is still work in progress and all new visitors are encouraged to provide feedback and comments about what you like, what you don’t like and what you would like to see more of.


In order to participate in the forums you must register as a user and why not introduce yourself to other members while you are there.


What to expect…

  • All your favorite “how tos”, tutorials and much more.
  • Keep up to date with the latest elementary news as well as featured editorials.
  • Interact with other community members on our forum –a place where elementary users can help themselves by asking and answering questions. Or just say Hi! 

What are the objectives of the elementarynow website?


  • elementarynow is a growing community supporting the official elementary OS project.
  • We strive to be a reputable source of information and guidance for all users of the “stable” elementary operating system.
  • elementarynow aims to popularize elementary OS for everyday computer users with all levels of computer experience
  • We recognize and support users who wish (or have a requirement) to utilize elementary OS a base and deviate from the “out of the box” experience by individualizing their desktop environment with the use of 3rd party decorations and applications.
  • elementarynow will always support and respect the intended design of elementary OS and its applications by making clear distinctions and warning in our publications when users ask to deviate.

Remember that the new website is still in it's testing period.

After this period the website reboot2elementary will retire.

May 26, 2014

Google Chrome With Double Icon In Plank

I recently downloaded Google Chrome from this page. The download for my computer is google-chrome-stable_current_amd64.deb ( Version 35.0.1916.114 ).

Installation is simple : right click the package and choose Open With Software Center.

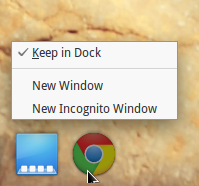
Start Google Chrome with Applications > Google Chrome and an icon will appear in Plank. Right click the icon and check Keep In Dock.


After closing and restarting Google Chrome a second fuzzy looking icon appears in Plank :


To solve this problem :

Open Slingshot ( Applications ) and type gksu in the searchbox :

Run pantheon-files as root :


Navigate to File System >usr >share >applications and find the Google Chrome icon. Right click and choose Open With Scratch.
On three lines starting with Exec=/usr/bin/  you need to replace  google-chrome-stable with google-chrome.

Done...

Update : this solution might not work anymore. What can work is the following ( in Terminal ) :
cp /usr/share/applications/google-chrome.desktop ~/.local/share/applications

Open google-chrome.desktop with Scratch and write under [Desktop Entry] the following line :

StartupWMClass=Google-chrome-stable

May 20, 2014

Kingsoft Office Elementary Style

Kingsoft Office is a commercial, closed-source office suite developed by Chinese software developer Kingsoft. Components include: Kingsoft Writer, Kingsoft Presentation and Kingsoft Spreadsheet.
The basic version is free to use, but a fully featured Pro version is also available, for the differences see here.

The latest version Kingsoft Office 2013 is highly compatible with MS Office, but one of the drawbacks is that it doesn’t support OpenDocument Format. Instead you can export your documents to PDF, or save them as MS Office formats or Kingsoft Office formats.

Download Kingsoft Office from here. The latest Linux binary at the time of writing is Linux Alpha 12 Patch 4.

The package kingsoft-office_9.1.0.4280~a12p4_i386.deb will usually be in Applications > Files > Downloads.
To install I used gdebi, a simple tool to install .deb files ( search for gdebi in Software Center if you haven't installed it yet ).

Right click the package kingsoft-office_9.1.0.4280~a12p4_i386.deb and choose Open With GDebi Package Installer.
A lot of extra 32-bit packages will be installed if running a 64-bit system ( see Applications > System Settings > About ).

Kingsoft Writer, ongmani skin ( right corner > Skin manager ) :


Zsolt Ádám Albert has altered this skin a bit to have a more elementary look :


Download the needed wps_office_elementary_theme.zip from here.

Open a Terminal and : 

cd Downloads
sudo unzip -o wps_office_elementary_theme.zip -d /opt/kingsoft/wps-office/office6/res/themes

Start e.g. Kingsoft Writer and right click the top bar and check Use System Title Bar.


May 15, 2014

Create And Modify Starters With Arronax

Arronax is a program to create and modify starters (technically: .desktop files) for applications and locations (URLs).
.desktop files are located in /usr/share/applications, but can also be placed in
~/.local/share/applications ( in your Home folder ).


Arronax supports Drag&Drop.

To install go to the Download section and download arronax-base_0.05_all.deb.
Right click the file and choose Open With Software Center.

Applications > Arronax will start the application.

Alternative : MenuLibre