Here is how I did my setup : open a terminal :
Applications > Terminal and copy and paste the following line :
sudo apt-get install network-manager-openvpn-gnome
( will pull in packages network-manager-openvpn and openvpn, the other needed packages are already installed in a default installation ).

Wingpanel > Network-manager-applet > Edit Connections....
Network Connections > VPN > Add , Choose a VPN Connection Type > PPTP > Create...

Go to VPNBook and look for the PPTP settings. I choose Server #3 : uk180.vpnbook.com (UK VPN - optimized for fast web surfing; no p2p downloading).

Connection name : VPNBook-PPTP-UK ( you can set any name )
VPN tab :
Gateway : uk180.vpnbook.com
User name : vpnbook
Password : qe6resTe ( password changes every one to two weeks ! , https://twitter.com/vpnbook )
Check : Show password
Check Available for all users.

Go to Advanced and check Use Point-to-Point encryption ( MPPE ) > press OK button.
Now can choose your VPN connection in the network-manager-applet...
To setup OpenVPN : Go to VPNBook and download one of the OpenVPN Certificate Bundles ( e.g Server #3 ).

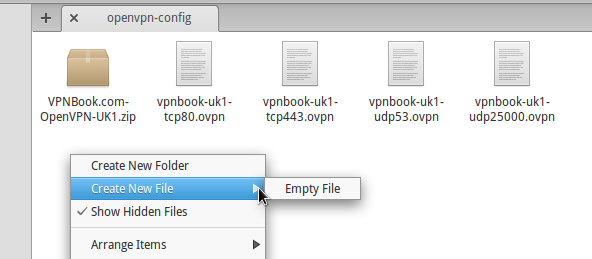
Create a new folder in your Home directory and name it e.g. openvpn-config.

Move the downloaded ( Applications > Files > Downloads ) OpenVPN Certificate Bundle ( VPNBook.com-OpenVPN-UK1.zip ) into the openvpn-config folder and right click and choose Open With Archive Manager.
Hit the button Extract files from the archive

Choose one of the .ovpn files e.g. vpnbook-uk1-tcp80.ovpn.
We need to create three files in the openvpn-config folder with the names : ca.crt, client.crt and client.key :
For the next copy/paste actions to work with Scratch ( default text editor ) we need to change it's Autosave feature :

Applications > Scratch > Menu ( gear icon ) > Preferences : uncheck Save files when changed .
This is a known bug : pasted text in Scratch will get lost with Autosave feature enabled...
Open the file vpnbook-uk1-tcp80.ovpn and copy the lines between the <ca> tags and paste into the file ca.crt, save ( second button from the left ) and close.
Copy and paste the lines between the <cert> tags into the file client.crt, save and close.
Copy and the paste the lines between the <key> tags into the file client.key, save and close.
Wingpanel > Network-manager-applet > Edit Connections...
In the window Network Connections > VPN > Import and navigate to the file vpnbook-uk1-tcp80.ovpn.
Window opens ( Editing vpnbook-uk1-tcp80 ) :
Connection name : choose whatever you like ( I choose VPNBook-OpenVPN-UK ).
Uncheck Connect automatically
VPN tab :
Authentication > Type : choose Password with Certificates ( TLS )
User name : vpnbook
Password : qe6resTe ( password changes every one to two weeks ! )
User Certificate : navigate to client.crt
CA Certificate : choose ca.crt
Private Key : choose client.key
Finally : Save
Now can choose your VPN connection in the network-manager-applet...
why is it that no one can give complete step by step instructions.As long as the step by step is incomplete, I can't get the result. In this particular post I was only able to do sudo apt-get install network-manager-openvpn-gnome. after that anything I type in the terminal does nothing. You assume I know how to create a file. You assume I will know how to open that file. You assume that I will know what name to give the file and what directory to save it to. I do not. Please, please, please write your instructions so that a 7 year old or 80 year old with no knowledge of computers can do it. Using Luna is becoming very frustrating because there are a lot of programs I want to add but I can't because instructions are always incomplete. I hate and detest windows, but I can always press the install button and it gets done. As long as the instructions provided by the community are only understood by those in the community then people will continue to use windows. I am almost 60 years old. Most people my age would have returned to windows. If Luna becomes non-usable i.e. programs that I want or need I can't install then I will have to. It is sort of like havinjg a car that wont start. It sits there and serves no purpose. Please help me not get there.
ReplyDeleteI see what you mean and I've spent some time time this morning to edit the post, changing the text and adding screenshots. I hope it is more clear now. If there are still any problems, please ask.
ReplyDeleteThank you Eric.
ReplyDeleteDo I need to include the tags at the beginning and end of each section that we copy and paste into these separate files?
ReplyDeleteTags are not included.
ReplyDeleteWhat do you put for the private key password?
ReplyDeleteit doesn't work for me, any suggestion? i think it's relacionated with any actualization? i mean this method is still working?, grettingssssssss
ReplyDeletefinally the vpn works for me, i just try the pass of the official web page and not the pass of the twitter account, it's that okay? grettings
ReplyDeleteI guess that's OK, so long as it works. Greetings, Eric.
Deletei am using elementary os freya 3.0 it didn't work for me my "edit connections" tab looks different way .
ReplyDeletealso i am not getting wat to do with pptp connetion pls help
DOES anyone know what the difference is with freya, as the poster above mentioned, the edit conections window look different, there is no vpn option
ReplyDeleteas above can't quite complete as last few steps don't match what I see in freya. Any ideas?
ReplyDelete